Thursday, June 25, 2015

Photoshop Elements.....for Quilters


In the Photoshop Elements online class one of the lessons

involved lightening images.  Many of the students lightened 

up dark images of their quilts, but I chose the images below...


We recently visited our son.  

My husband took this picture of us:


You can kind of see my son and I, 

but our doggie Gunnr is only a silhouette...

This image probably would have ended up in the trash bin.


This lesson taught us to lighten the image...


...then saturate the color back into it in the correct places.


This is definitely useful for an image of a quilt that needs to 

be lightened and have the color corrected.


I took this photo out the back door...


There is a fog bank down below the back yard 

because the river runs through the fields.

I like this image, but decided to play with it 

to see what I could do with it.


This image has been lightened...


This image has the color saturated.


I took this image of a dandelion seed head years ago:


I knew this image had potential and saved it...


In class I cropped it...

Much better already, more focus on the dandelion


Then I lightened the seed head...


Then, just for FUN....I oversaturated it a bit.

I love the way the seed head sparkles and twinkles now and

I love the lime green grass in the background.

This is an image that could be printed out and quilted.


You can find out more about this online class here:


CLICK HERE:  to see My Quilts


May Your Bobbin Always Be Full,


LuAnn Kessi

Wednesday, June 24, 2015

Photoshop Elements......for Quilters


As I review these images from my 

Beginners Photoshop Elements online class...

I can't believe how much we learned in 12 lessons!


I will share a few more techniques I learned.


We learned to adjust the color on images:


Original image of pink Iris


The entire image has been colorized....

the pink iris is now blue/purple, the yellow background 

flowers are now red.


Original image of pink clematis


The entire image was colorized.....

green clematis and blue leaves......wild!


In this image the clematis flowers remain pink, 

but the leaves are blue.

We were taught to colorize one area and not another.


Original image of lily bud

I was watering the flowerbed with a soaker hose and caught

 the water drops in the sunlight.


I colorized the entire image and really punched up the color

 of the water drops and the background leaves.

This would be great printed out on fabric and thread painted.


Original image of Lily


Only the pink centers of the lily 

were colorized a brighter pink.


The lily remains the original color, but the green background

leaves have been colorized to be a bit brighter.


Many of the students in class did this same color technique

with fabrics from their stash.


You can find out more about this online class:


CLICK HERE:  to see My Quilts


May Your Bobbin Always Be Full,


LuAnn Kessi

Tuesday, June 23, 2015

Photoshop Elements.....For Quilters


I have one week left in my 

Photoshop for Quilters online class.

I thought I would share another PSE technique with you:


The point of this lesson was to take an image and

edit it so that you could print out a pattern to create

an applique quilt.


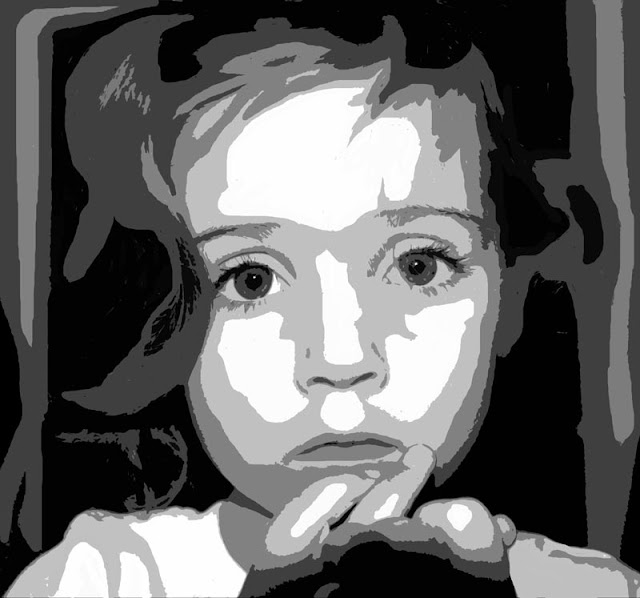
I chose a favorite image of my niece, Lilly:


Original Image


Image changed to black and white with levels adjustment


Image deepened with Hue and Saturation adjustment


Image has been posterized


 Then we were taught to soften the edges 

of the posterized version so that this could be printed out and 

used as a pattern to create a portrait quilt.

These softened edges would be easier to cut out of fabric.

If you look at the version above this one, you can see how 

much more detail there is in her hair that I removed.

After the quilt top is completed, I could go back in

and add that hair detail back in with machine quilting.


How cool is that!


You can find out more about this online class here:


CLICK HERE:  to see My Quilts


May Your Bobbin Always Be Full,


LuAnn Kessi


Monday, June 22, 2015

Photoshop Elements......for Quilters


I have received lots of interest from all of

you about the Photoshop Elements class I am taking

now with the Pixeladies, so I thought I would

share more of what I am learning with you...


If you click on Pixeladies above, it will take
you to their website to learn more.
You can sign up for their class email list and
they will contact you when they schedule their
next series of classes.


Here is a bit more of what I learned this month
in the beginners 1 Photoshop Elements Class.

By the way, the only requirement to take this class
was to have Photoshop Elements 13 loaded on your computer
and be able to open the program.
The Pixie Ladies teach you from the ground up.


We were asked to choose an image of a crooked quilt:


This is the Floral Monet Quilt I finished last month.
My husband is holding it up so I can photograph it.


First.......crop the image


Next.......straighten the image


Next.......lighten and correct the color of the image


We learned how to copyright our images...

my name and copyright symbol at bottom right.


We also learned to place a watermark on our images.

Notice my name faintly across the center of the image.


Great Stuff for a Quilter.......don't ya think!


CLICK HERE:  to see My Quilts


May Your Bobbin Always Be Full,


LuAnn Kessi

Sunday, June 21, 2015

Photoshop Elements.....for Quilters


I am just finishing up on online class:

Photoshop Elements 1 for Quilters


We had 12 lessons this month and I am so happy

with what I have learned...


In one of the lessons we were taught how to audition quilting 

designs on a quilt top...


My drawing lines are a bit rough.....try drawing with a mouse!

But I definitely got a feel for whether or not this design
 would work on this quilt top.


I auditioned a large leafy vine...


We were taught to use layers,

so we could see only the lines we drew and not the quilt top


This technique is great FUN and

truly designed for the quilter in mind.


In another lesson we were taught to digitally

cut up a piece of fabric...


This is one of my ice dyed fabrics


We cut up our fabric digitally and made it

into a 9 patch


I am signed up for the next class:

Photoshop Elements 2

for the month of July.


CLICK HERE:  to see My Quilts


May Your Bobbin Always Be Full,


LuAnn Kessi


Thursday, June 18, 2015

Life through a Quilters Eyes....


I am busy in the hay field, but still would like to

share some Quilty Goodness with all of you...

Here is a BLAST from the PAST

Turn up your speakers and enjoy:


Click to play this Smilebox slideshow
Create your own slideshow - Powered by Smilebox


CLICK HERE:  to see My Quilts


May Your Bobbin Always Be Full,


LuAnn Kessi