Saturday, July 20, 2013

Hexy Text.....Take-A-Long Quilt


It is amazing how long it takes to finish a quilt

you're not working on...


In December 2012 I added the border hexagons...


Love the texture of the darker fabrics

on the border...


I decided I wanted straight edge borders

 on this lap quilt...


While on our recent road trip, I began adding

half diamond shapes to the edges of the hexagons...


This is tiny and tedious paper piecing,

but what else I am going to do at 55 mph...


On the left side, you can see that the quilt top

 now has a straight edge border....


I was able to complete 3 sides of the quilt top

 while we were on the road...


We are planning to do more traveling this summer...


So, there is fresh hope of finishing this quilt top soon!


Gunnr is still spending lots of time in the hay fields...


All of the hay has been cut, raked and baled.

Now to load it up on trailers and store it in the barns.


CLICK HERE to view Paper Piecing Posts


CLICK HERE to see my take-a-long quilts


CLICK HERE to view my online Sketch Book


CLICK HERE:  to see My Quilts


May Your Bobbin Always Be Full,

LuAnn Kessi


Wednesday, July 17, 2013

Paul Harvey Quilt......Washington State


The Paul Harvey Quilt is on the move...


Leavenworth, Washington


Cle Elum, Washington


Roslyn, Washington


White Swan, Washington


San Juan Islands, Washington

I was so fortunate to snap this photo while the Orca

was breaching out of the water!


Yes, Gunnr sleeps with Paul Harvey

when we are on the road.


CLICK HERE to see why this quilt is Paul Harvey


CLICK HERE to view my Thread Shed


CLICK HERE to view My Tutorials


CLICK HERE to view my online Sketch Book


CLICK HERE:  to see My Quilts


May Your Bobbin Always Be Full,

LuAnn Kessi

Tuesday, July 16, 2013

Quilting Sketch Book....Cat's Claw Feather Tutorial


This is what I consider to be a

Beginner Level Feather


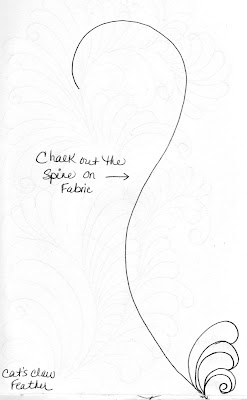
Cat's Claw Feather

There is no back tracking when stitching.


I photographed the feather 

as I drew it out...

You may use this as a tutorial if you like:


1.....Chalk out the Stem Line on Fabric


2....Stitch out a curl on the bottom right

DO NOT lift your pen off the paper,

keep the pen in the center of the curl.


3....Trace back over the center of the curl,

and add an echo around the curl to reach

the spine line.

This is the Cat's Claw shape


4....begin your first plume


5.....finish your first plume

DO NOT take your pen off the paper


6.....echo back around the plume

to create the cat's claw shape


7.....You have completed your first

plume with a cat's claw


8.....Stitch out your next plume


9....Add the Cat's Claw


I think you are getting into the routine...


10...continue adding plumes and cat's claw


11.....the right side of the feather is done

DO NOT take your pen off the paper!


12...Travel stitch back down the spine line


13...Start another curl on the left side


14...continue to add plumes 

and cat's claws up the left side


Cat's Claw Feather:


Give  it a Try!


Inspiration from the Flower Beds:


Orange Gerber Daisy....after morning watering


Pink Star Lily


Yellow Star Lily


A post would not be complete without this guy:


Gunnr.....resting in the pick up seat

Yes, he has his own personal pillow in all 

of our vehicles.


CLICK HERE to view my Thread Shed


CLICK HERE to view My Tutorials


CLICK HERE to view my online Sketch Book


CLICK HERE:  to see My Quilts


May Your Bobbin Always Be Full,

LuAnn Kessi