Tuesday, June 23, 2015

Photoshop Elements.....For Quilters


I have one week left in my 

Photoshop for Quilters online class.

I thought I would share another PSE technique with you:


The point of this lesson was to take an image and

edit it so that you could print out a pattern to create

an applique quilt.


I chose a favorite image of my niece, Lilly:


Original Image


Image changed to black and white with levels adjustment


Image deepened with Hue and Saturation adjustment


Image has been posterized
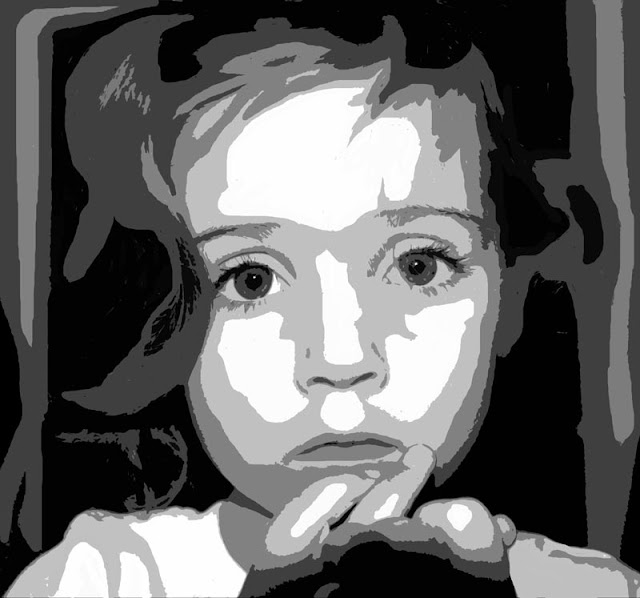


 Then we were taught to soften the edges 

of the posterized version so that this could be printed out and 

used as a pattern to create a portrait quilt.

These softened edges would be easier to cut out of fabric.

If you look at the version above this one, you can see how 

much more detail there is in her hair that I removed.

After the quilt top is completed, I could go back in

and add that hair detail back in with machine quilting.


How cool is that!


You can find out more about this online class here:


CLICK HERE:  to see My Quilts


May Your Bobbin Always Be Full,


LuAnn Kessi


Monday, June 22, 2015

Photoshop Elements......for Quilters


I have received lots of interest from all of

you about the Photoshop Elements class I am taking

now with the Pixeladies, so I thought I would

share more of what I am learning with you...


If you click on Pixeladies above, it will take
you to their website to learn more.
You can sign up for their class email list and
they will contact you when they schedule their
next series of classes.


Here is a bit more of what I learned this month
in the beginners 1 Photoshop Elements Class.

By the way, the only requirement to take this class
was to have Photoshop Elements 13 loaded on your computer
and be able to open the program.
The Pixie Ladies teach you from the ground up.


We were asked to choose an image of a crooked quilt:


This is the Floral Monet Quilt I finished last month.
My husband is holding it up so I can photograph it.


First.......crop the image


Next.......straighten the image


Next.......lighten and correct the color of the image


We learned how to copyright our images...

my name and copyright symbol at bottom right.


We also learned to place a watermark on our images.

Notice my name faintly across the center of the image.


Great Stuff for a Quilter.......don't ya think!


CLICK HERE:  to see My Quilts


May Your Bobbin Always Be Full,


LuAnn Kessi

Sunday, June 21, 2015

Photoshop Elements.....for Quilters


I am just finishing up on online class:

Photoshop Elements 1 for Quilters


We had 12 lessons this month and I am so happy

with what I have learned...


In one of the lessons we were taught how to audition quilting 

designs on a quilt top...


My drawing lines are a bit rough.....try drawing with a mouse!

But I definitely got a feel for whether or not this design
 would work on this quilt top.


I auditioned a large leafy vine...


We were taught to use layers,

so we could see only the lines we drew and not the quilt top


This technique is great FUN and

truly designed for the quilter in mind.


In another lesson we were taught to digitally

cut up a piece of fabric...


This is one of my ice dyed fabrics


We cut up our fabric digitally and made it

into a 9 patch


I am signed up for the next class:

Photoshop Elements 2

for the month of July.


CLICK HERE:  to see My Quilts


May Your Bobbin Always Be Full,


LuAnn Kessi


Thursday, June 18, 2015

Life through a Quilters Eyes....


I am busy in the hay field, but still would like to

share some Quilty Goodness with all of you...

Here is a BLAST from the PAST

Turn up your speakers and enjoy:


Click to play this Smilebox slideshow
Create your own slideshow - Powered by Smilebox


CLICK HERE:  to see My Quilts


May Your Bobbin Always Be Full,


LuAnn Kessi


Monday, June 8, 2015

Feathers.....Tight and Loose


I am trying to change up the way I stitch 

out feather designs...


The plumes on my feathers fit tightly together...


The plumes are stacked tightly against one another...


The plumes fill up all available space...

I love this look.


The image below shows feathers on the same curvy vine

that have been drawn out differently:


The feather on the left has very tight fitting plumes.

The feather on the right has open areas with loose plumes.


I am making a concentrated effort to create feathers

that have a looser appearance...

(these images are drawn in pencil, I hope you can see them)


The plumes have space between them...


This gives the feather a more playful attitude...


This style of feather has a bit of whimsy to it...


This is a playful feather...

Not so serious as tight feathers above...


It is difficult for me to leave so much open space.

My process is to fill ALL available space...


However, after an afternoon of drawing loose feathers,

I am grooving on how relaxed they make me

feel to draw them out.


Print one of these feathers out and trace it...

let me know if you like it.


Photography from the flower beds:


Nasturtium Leaves......after the rain


The rain drops bead up beautifully on these leaves


CLICK HERE:  to see My Quilts


May Your Bobbin Always Be Full,


LuAnn Kessi

Thursday, May 28, 2015

Quilt Designs.....from my Sketch Book


A few more images from my Sketch Book:


All-over Feather Fill


A couple more designs I am considering using

on the raffle quilt:


Lately I am enjoying drawing designs that flow

under one another...


I am leaning toward this style of quilting for

the raffle quilt.


Here's a design I found from last year:


Feathers on a Half Shell


The Iris bed has been putting on a show for

a couple of weeks now:


CLICK HERE:  to see My Quilts


May Your Bobbin Always Be Full,


LuAnn Kessi